Showing posts with label Bento Box. Show all posts

Sunday, February 10, 2013

Design Notebook - Opinions Needed!

Baby Greer is having a sister in April, and I'm working on a layout for her quilt.  I need your help.


I bought some cute fabric* at Tiny Stitches about a month ago, thinking I would do a Bento Box or maybe another Double Disappearing Nine Patch.

But then I saw this beauty over at The Thompsons, which led me to this pattern from Moda Bake Shop, which led me to get out my graph paper and crayons.

I can't decide.  Which one do you like best?  Leave a comment please!

Setting A

Setting B

Setting C

*Fabric information:  The purple dot is called "Kiss Dot" by Michael Miller Fabrics.  CX5518.  The pink is from the Sew Stitchy line by Aneela Hoey for Moda.  18548.  The focus fabric is from the Children at Play line by Sarah Jane for Michael Miller Fabrics.  DC5102 Summer Gardens. 


Saturday, January 21, 2012

Modern Blocks Quilt Along - Boxed In

Today's Modern Block is Boxed In by Faith Jones.

This is a fun simple block that gives you a chance to experiment with value and scale.  It reminds me a little bit of a wonky bento box, and I think you could assemble it the same way I did the one for Deuce.

I played a little bit with the fabric and used one 1930's print and one "modern" print in each color. I think this would make a very cute and fast baby or kid quilt in all kinds of bright colors, and I'd love to see it all done in batiks.


Thursday, December 29, 2011

Modern Blocks Quilt Along - Four Acres

Now that the site is back up, the Modern Blocks are back!

My next block in the Modern Blocks Quilt Along over at SeamedUP is called Four Acres by Solidia Hubbard.


Let me tell you, this block went together in no time flat!  (Perfect for the week before Christmas.)  I think it would be a real stunner in a big bed quilt and would be such a fast quilt with a big impact.   It reminds me of a Bento Box, which I love.  Same visual appeal, same quick assembly.  This one's a keeper.


Monday, August 8, 2011

Oversized Disappearing Nine Patch Tutorial


Although this quilt is everywhere, and I'm possibly the last quilter on earth to make one, I thought I'd give you a quick overview of how I did it and the size blocks I used.

Recap:  A Disappearing Nine Patch block is a Nine Patch that you cut in half horizontally and vertically and then rearrange the resulting blocks.  There are numerous layouts you can use, although I haven't found one site that lists them all.

Here are some that I love and considered:

Chain

Easy Sashing and Cornerstones

On Point

Twist and Turn

Random

I chose to make the "chain" style (and that's only my name for it, as far as I know).  I wanted it to be a little less random and scrappy looking for this particular quilt.

I liked how the giant Bento Box blocks turned out on my older son's quilt, so I went for the same look here.  After playing with the math, I ended up with twelve 19 1/2" blocks.  This gave me a finished quilt that was 58 1/2" x 78". 

To get these, I chose six green fabrics, six gold fabrics, and one black fabric.  You need 2/3 yard of the black, although I bought a yard so I can use it for the binding as well.  You also need 1/2 yard EACH of the green and gold fabrics if, like me, you found six different ones.  If you only use one of each color, then you will need 2 yards of each.  Plus you need any border or back you choose. 

I cut eight 7" squares from each green and each gold fabric (for a total of forty-eight green and forty-eight gold).
I cut twelve 7" squares from the black fabric.

Before doing any sewing, you need to decide if you want the blocks to be the same (as in, the same green in each corner and the same gold in all four places) or truly scrappy.  I tried to audition them both ways, but it was a little tricky to envision.  If you are unsure, sew them together so they are the same, and try mixing them up after they are cut.

I wanted mine to be as scrappy as possible, but I got a little controlling with making sure that there weren't clumps of the same color.  Here's how I did it:
    1.  Lay out the stacks of fabric so that all of the squares in the stack are the same.

    2.  Take 2 squares from each green fabric and set them to the side.
    3.  Take 2 squares of each gold fabric and sew them to a black square. Press towards the black.

    4.  Now you have 6 remaining squares of all 12 fabrics.  Starting with one green stack, pair each one with a different gold square.    Follow this pattern for the remaining five green fabric stacks.  This will use up the remainder of the squares.  Sew these pairs together.  Press all of your pairs towards the green. 
    5.  Sew each black/gold pair to a green/gold pair, ensuring that the gold fabrics are different.  Press toward the green/gold pair.  You will have green/gold pairs left over.


    6.  Select another green/gold pair that has different fabrics and sew it to these blocks.  Press towards the black.  You will have green/gold pairs left over.


    7.  Now take your remaining green/gold pairs and the green squares you set aside in step 2.  Sew a different green to each one.  Press towards the green.


    8.  Lay out your blocks to make sure they are as scrappy as possible and sew the bottom row onto your nine patch.  Press toward the center.


    You should now have 12 scrappy nine patch blocks.  Cut each one in half both horizontally and vertically.  Now you have 48 ten inch blocks.


    Lay the blocks out in whatever way pleases you and sew together.  I prefer the "chunking" method to sewing them in rows.

    Add a border if you prefer.  I chose not to.  Press well.  Sandwich for quilting.

    Quilt as desired.

    Just kidding!  You know that's my pet peeve!  Of course you can quilt it however you'd like.  I chose to use a grid similar to the crosshatch design on my older son's quilt.


    If you try this, let me know how the directions might be improved.  I'd love to see pictures of your D9P quilt!


    Saturday, June 27, 2009

    Bento Box Tutorial

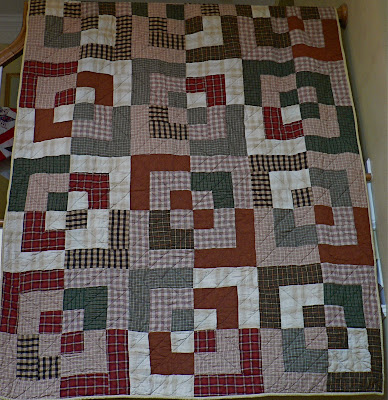
    bento box quilt tutorialAs I've shared, my oldest child is graduating to high school this year, and I wanted to mark the occasion. At the same time, my husband has been telling me that "we" needed a new quilt for our son's room since the one he currently uses was a preschool graduation gift from his Gagi(my mom). It is still in fine condition, but it has an appliqued circus train on it and, while I find it the perfect girl repellent, both husband and son believe he is ready to move on to a slightly more mature look.

    (OT: That reminds me of a quilt I saw one year at the East Cobb show that was a gift for a young man going off to college. It was a great, masculine quilt, very simple, with a giant spider appliqued in the center. The spider left you scratching your head for a moment until you read the description and the title "Girls are Afraid of Spiders." I loved it!)

    Anyway, I have been dying to do a Bento Box quilt, and this seemed like just the opportunity. I found some lovely flannel plaids and mixed in the colors of his high school and my alma mater, Florida State (because the boy is a 'Nole fan - I always knew he was my favorite!)

    The thing about a Bento Box, though, is that every time I looked at the pattern I thought there must be a better way to do it. Logically it would seem so much easier to make large Courthouse Steps blocks, cut them in quarters, mix them all up, and then sew them back together. Right? Right. But I couldn't find a pattern like that. If I figured it out myself there was all that math. And you know how I feel about that.

    Then one day I was googling-when-I-should-be-working and came across this blog and tutorial and person who obviously thinks like I do (poor soul!) and had gone to the trouble of figuring it out. Now, she hadn't done all the math for me for the particular sized blocks I wanted, but by looking at her work I realized it was really very simple and nothing to have a phobia about.

    The down side to this method, according to Melissa, who has made several gorgeous Bento Box quilts, is that you don't get as much variety. She has a terrific method for making every box different, which I hereby challenge her to write as a tutorial for her blog. That actually was okay for me, though, because I made this out of plaid flannels in certain colors and didn't have time for lots of shopping. My choices were pretty limited anyway, so going to a lot of trouble to mix them all up was going to be a waste of time.

    So here's what I did:

    I bought 1/2 yard of each fabric - 6 darks and 6 lights. You could use as many different fabrics as you wanted and you would still need the same amount for this size block. Just make sure to get an even number of darks and lights.

    My Bento Box units finished at 10 1/2" and the Bento Box blocks finished at 21". The quilt is set 3 x 4 blocks, for a total of 12, and was 63" x 84" before any border. This is a nice twin sized quilt.

    You have to cut these just right to get all of the pieces out of 1/2 yard of fabric, but there is almost no waste. The following instructions are for each fabric, and you will need an equal number of lights and darks:
    1. From each 1/2 yard, cut 2 - 8" strips. Cut ONE 8" square from EACH strip.
    2. Cut ONE of these 8" squares in half to make 2 - 4" x 8" strips.
    3. Cut the first strip to a length of 22", then in half lengthwise to make 2 - 4" x 22" strips
    4. Cut the second strip in half lengthwise. Then cut 4 strips 15" long for a total of 4 - 4" x 15" strips.
    Now you should have:
    •  1 - 8" square
    • 2 - 4" x 8" strips
    • 4 - 4" x 15" strips
    • 2 - 4" x 22" strips
    Let's move onto the sewing. Match up pairs of dark and light fabrics so that you have a nice variety. I have given the instructions for the half of the blocks with dark centers and outsides, but obviously you reverse that for the other half of the blocks.
    1. Sew the light 4" x 8" strips to either side of the dark 8" square and press.
    2. Sew the light 4" x 15" strips to the other two sides of the square and press.
    3. Sew the 4" x 15" strip that matches the center square to the first two sides that you sewed and press.
    4. Sew the matching dark 4" x 22" strip to the last sides and press.

      bento box quilt tutorial
    • Fold the block in fourths and lightly press as a cutting guide. Measure and cut each block into fourths.
    Now is the fun part of laying out the blocks and rearranging them. I chose to do this one day when the Wanna Bees were there so I could get some input. Taking a picture helps you to visualize the quilt from far away, so you can see it without getting overfocused on each individual block.

    I sewed them together in pairs and then again to make the actual blocks, then sewed the blocks together to make rows, and then sewed the rows together. Easy as pie!

    I chose not to add borders, but you could if you wanted to adjust the size. I laid mine on a twin sized bed and found it to be a little wider and several inches longer than the quilt he has on there now, so I decided to go with that.

    For the back, I found this great flannel, but there wasn't enough left on the bolt. I divided it in half and then pieced some of the binding fabric into a center strip to make it long enough. Be creative! Pieced backs are very interesting. If I had flannel in my stash that didn't have reindeer on it, I would have shopped from my stash instead of buying fabric.

    Obviously you can quilt it any way you want, but I always hate when books say "quilt as desired." Like a suggestion would kill them? I decided to do a large crosshatch design through the actual boxes. Then I quilted two concentric squares inside the squares that the crosshatching created. It made a really nice design and quilted up beautifully. I hope you can see it in this picture:
    bento box quilt tutorialThen I just bound it with some of the gold flannel and added a label that included a picture from his first day of school and one from graduation.

    Let me know if you try this and what you think of the tutorial. Did I leave out anything essential? Please share and link back. I love to see pictures of how ideas grow.

    Sunday, May 24, 2009

    The Graduate

    Tonight we went out to celebrate my 8th grader's graduation. As a surprise, I booked The Captain's Table at P.F. Chang's. It is a table behind the bar, practically in the kitchen, where you get to watch all of the action. It is one of B's favorite places, and he loves to cook, so it was a very cool experience. It was also very LOUD. I'm not sure I'd want to sit there every time since conversation was tricky, but it was fun to do at least once. This was our view:
    After we ate far too many dumplings and everything else on the menu, it was present time. He was excited to get a trip to NYC this summer with one set of grandparents, and the lacrosse goal he'd been saving for from the other. Then it was time for the big box from Mom and Dad. I figured he knew what it was, since he had been in and out of my room while I worked on it a hundred times.

    But no, when he saw the matching pillowcase on top he said, "You got me sheets?"

    We don't call him Captain Oblivious for nothing, you know.
    Finally the light bulb went on, and he was so appreciative of the quilt. He couldn't believe I had made it for him, and went right up to put it on his bed when we got home. It was a great night.
    Here's what the finished product looked like:
    I'll try to get the rest of the tutorial written and up soon. It was a super easy quilt to make and went together in no time. It only took 6 yards of fabric for the front, and would be great for shopping out of your stash.

    Have a safe and happy Memorial Day!

    Friday, May 22, 2009

    The Nest

    For those of you who get my posts in a reader, you might not have noticed this new button in my sidebar from The Toby Show:


    They have robins nesting in their front porch planter, and Jonah Lisa is documenting it via "Nest Cam." You can click on the link to see the daily updates which, so far, amounts to a beautiful, perfect, new, blue egg a day. So far there are three, and the family has gone to some great lengths to keep the area free from any stress for the robins. This makes me smile every time I click on it, especially as my own nest is going through some changes.

    Yes, I dropped off my 8th grader at school for the last time today. Graduation is Tuesday evening after nine years in the same old carpool line. It feels like only yesterday that I strapped a very newborn Gracie into her carseat and took him to his first day of kindergarten; now he is registering for high school (Driver's Ed - EEK!). Where does the time go?

    It's a race to the finish on his Bento Box quilt, of course. I've quilted all the cross hatching, all of the border half-squares, and 7 of 17 of the middle squares. I made my binding and realized I am a little short, so I need to add a strip. Hopefully by Sunday it will be done, although I want the label to include the picture from his first day of school and one from graduation.

    Yes, my nest is feeling a little dusty and quiet. Spring sports have ended and summer break is almost here. We are due for a big clean, but not today. No, today I think I will listen to the baby birds out my window and take some time for a little quilt therapy.

    How about you?

    Wednesday, May 13, 2009

    It Might Leave a Mark

    I've already blogged about what I hate most about quilting.

    Here's the thing that...well, I don't exactly hate it, but I'm generally lazy and don't bother to do it right:
    Yep, basting a quilt and then marking it (or vice versa) is so tedious and slow when I just want to get to the quilting part that often I just skip it and free motion quilt or eyeball my - ahem - "straight" lines.

    And normally when I have a very geometric pattern, such as the Bento Box, I lean toward a more curvy-swervy-fluid quilting design (yes, that's the technical term) to break up all those lines. For some reason, though, this one seemed like it needed more lines, just going in different directions.

    I saw this quilting design, which I've never used, while flipping through an old book that I've used once and have considered selling or giving away. And, upon further thought, I realized that this was not something I could just eyeball or freehand and have it come out looking right. Good thing, because when I sat down to mark the quilt I couldn't even draw it freehand, much less quilt it that way. It took a ruler and some contemplation and a LONG time.

    I hope it is worth it.

    Now I'm going to see if I can find a nice variegated thread to use, because the basic tan I had planned to quilt with seems a little boring after all of that. The Wanna Bees are meeting tomorrow, so I hope to make some progress.

    Also, I have to brag. I have blueberries!
    There are only about 8 of them, but I am so excited! I have always wanted blueberries, ever since an older gentleman at a nursery once told me that they are the perfect plant: drought resistant native to GA, with flowers in spring, so-good-for-you berries in the summer, lovely colored foliage in fall, and evergreen in winter. My mom bought me two plants in February, but Daisy kept digging one of them up (but left the other alone - no clue why). We are down to this one little lovely with her 8 berries so far. I can't wait to taste one.

    Anyone know when they are ripe?

    Have a great day!

    Friday, April 17, 2009

    Hosting the Wanna Bees

    I love my bee group!

    The creativity in the room, the spark of an idea, and the willingness of everyone to share feedback and advice is priceless. Totally worth packing up your machine and dragging it to someone else's house.

    But my favorite day is hosting. Now some folks might think it is a hassle to have a (mostly) clean house and get all your quilty stuff set up to make room for everyone to work in the public areas. I, however, am like a puppy; I'm a pack animal. I love to be in my own environment with all my people around.

    Speaking of puppies, this was Daisy's first chance to meet everyone. She was very well behaved except for one moment when she walked on my quilt and a little bit on Lene's. Luckily everyone in my bee has at least one dog and is very canine tolerant.

    Anyway, we had a great day. My mom even stopped by for some advice on a baby quilt she is working on.
    Lene was doing the most tedious paper piecing I can imagine, although it is gorgeous.
    Lynn was working on her bright quilt, and Ben was creating another masterpiece that can only come from the artist's mind.
    I was busy rearranging my Bento Box blocks, and had lots of help with the layout. This is one of my favorite things about the bee group - the input when you just aren't sure where to go next. I decided on a design and got more than half of the blocks put together already. I'm also trying to write the tutorial for this method as I go so that, when the quilt is complete, I can just click "post" and you will all get to see how it worked. So far I have to give it an A++ for easy (a beginner could do it) but only a B- for my fabric choices and the variety you get from using this method.

    I hope to take the motivation and inspiration from yesterday and use it to propel me through a weekend of sewing. What are you working on?

    Thursday, April 9, 2009

    Love/Hate

    The thing I hate most about quilting - this is a no-brainer! Isn't it the same for everyone? I hate ripping out when I've made a mistake. Faced with too much of it, I have been known to abandon a project completely or, if fabric is plentiful, chuck the messed up piece and start over. Wasteful and lazy, but I HATE it.

    Sometimes in my impatience and desperation I resort to this:

    At the same time, the thing I love most is figuring out a way to do something better, faster, and more economically. I don't just mean financially by using less fabric and saving actual cash, but also economy of time and movement. That is why, when I was trying to figure out a Bento Box pattern, I was excited to find this tutorial that saved several sewing and cutting steps.

    I figured out how much fabric I needed to make a twin sized quilt, and how to cut the pieces out so that I could get the exact number I needed from a half-yard of each fabric. It came together so perfectly once I did it that I will definitely put it all into a post when I am done (or at least done enough to post a picture of the quilt top). It is easy enough for a beginner and - without time for my mistakes and ripping out - would be such a quick quilt if you needed a gift.

    I love when the lightbulb goes on so I can get back to this:

    I hope your day is frustration free!
    Related Posts Plugin for WordPress, Blogger...