Showing posts with label basting. Show all posts

Wednesday, July 20, 2011

Basting the Bear's Quilt

I've mentioned before that basting and marking a quilt isn't my most favorite thing.  I've tried basting with needle and thread (kill me now), spray basting (quick but makes me nervous about gumming up the machine), and pinning.  I've basted on my family room floor, kitchen counters, and dining room table.  There's no way around it - it's a hassle.  That's my excuse for why the Bear is still sleeping under his train quilt.  Oh, it won't kill him!

I was whining about it to discussing this with the WannaBees last week, and Jodi suggested that I try Sharon Schamber's method with two boards.  Jodi even had the boards for me to borrow, so that's hard to turn down.  I'm not going to go into a big discussion of how to do it when the video is a much better tool, except to say that I chose to pin instead of basting with needle and thread.  It still worked great.  I will also say that it is much easier to do with a tiny quilt, like Sharon does in the video, than a twin sized quilt, but it still worked better than the floor or taping the back to my kitchen counters in sections.

Here you can see that this fit on my dining room table.  It was nice, as Jodi mentioned, to be able to sit at the table and pin a section in between other tasks vs. crawling around on the floor begging the dogs to stay off the quilt for just a few minutes. 

Who? Me?
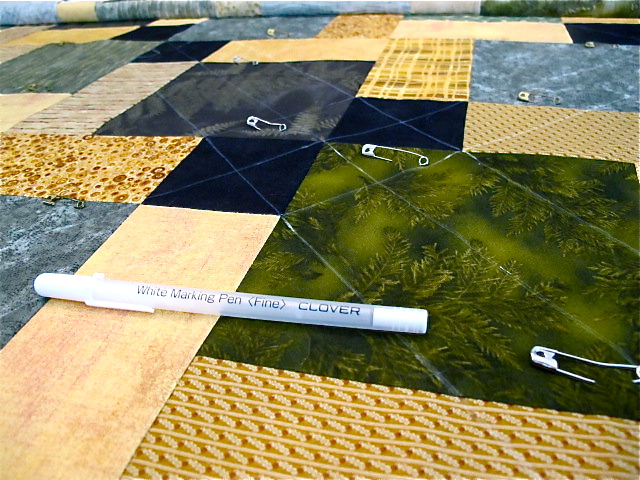
I also realized that this was a perfect time to mark the quilt.  The quilt is laying nice and flat on a large table, so you can see all the points you want to match up and have enough room to lay a long ruler across it.  I used my favorite white pen again and marked the cross hatching in no time at all. 


I hope to start the quilting today, although I definitely need more thread.  I'm not sure what I was thinking when I bought only one spool.  Luckily Mom and I are going on a field trip this week to A Scarlet Thread, the largest quilt shop in Georgia! 

Below are links to the two videos.  Let me know if you've tried this method and liked it, or if I am missing out on something else. 


Thanks so much to Sharon Schamber for sharing this technique, as well as the many free tutorials on her website.  She is a fountain of information!  Also, thanks to Jodi for letting me try out the boards. 


Monday, June 6, 2011

In Progress - Extra Wide Back

No, the title is not a reference to my rear end after spending so much time online and on the couch watching the Casey Anthony trial.

The Bear's Graduation quilt top is complete and I did not have enough appropriate fabric in my stash to piece a back, so I took a little road trip over to Tiny Stitches to spend my Mother's Day gift certificate.  When I walked in, the ever-helpful staff asked what I was working on and looking for.  I explained my quest, and was immediately pointed in the direction of a whole display of extra wide fabric intended for backs. 

Is there anything more perfect than this Timeless Treasures Tonga Batik in forest?  Only that it is already extra-wide so I don't have to piece the back.  The icing on the cake was, of course, the gift certificate so it didn't cost me a dime!

I'm off to baste my quilt.  I hope you have a day where everything goes your way!


Sunday, March 6, 2011

Basting Party

All three baby quilt tops are done, and we had some gorgeous weather earlier in the week, so I took advantage of the sunshine to do a mass basting.

I've done this several different ways. I was taught to do it with needle and thread. Although I see the benefits of this method, I dislike doing it. I always end up with puckers on the back, it takes forever, and kills my back. 

The second way I have basted is with pins. This is my second choice, but still not my favorite. I can't stand it when I'm on a roll and all the sudden a pin is in my way. It is also annoying when you are hand quilting and the thread gets caught around a pin.

My favorite way is spray basting. Maybe it's the lazy way. Maybe it's the environmentally unfriendly way. It can gum up your machine if you are too heavy handed. It's still my favorite.

How I do it is this:
  • I spread a flannel backed, plastic tablecloth on our picnic table outside on a sunny day.  I try to wait until the wind is calm.
  • I smooth the backing fabric, wrong side up, on the table.
  • I lay the batting on top of the backing fabric and smooth it, double checking to make sure the back is still flat.
  • I lay the quilt top, right side up, on the batting so that there is some back and batting showing around the edges.
    • Unless the quilt is very large, I flip it over so the backing fabric is on top.  Then I roll up one end of the backing fabric about halfway.  (Disclaimer:  these pictures are of me basting the top, not the back, but it's the same process.)
      • Shake the can of spray basting thoroughly.  
      • Lightly spray the batting in a sweeping, side to side motion.
      • Roll the backing fabric carefully back into place, making sure that it is smooth.  
      • Follow steps 7-8 with the other half of the quilt back.
      • Allow to dry for a minute or two, then flip the quilt back over so the top is face up.  Make sure it lays smooth.
      • Follow the same steps as for the back, rolling the top up, spraying the batting, and smoothing the quilt top back into place.
      • Get quilting!
        How do you baste? 

        Monday, January 10, 2011

        Two Down - The Minkee Quilt

        I finished whipping down that small section of binding on the charity quilt and moved right along to putting the long-lost blanket binding on Gracie's minkee quilt.

        I started this quilt about five or six years ago when my husband was in Las Vegas for a long weekend.  I got most of it done in just a few days, and then put it in the pile for another few years.  Why do I do that?

        I finally finished it a year or so ago, except for putting on the blanket binding.  Grace has been using it like that the whole time!  After losing and finding the binding, I got it stitched down last Monday just in time for the guild's UFO challenge night.

        This was a very easy quilt, despite how long it took to finish.  I had bought the minkee and the flannel back on a quilting weekend in Panama City Beach with my friend, Pam.  There is a terrific little shop there called Quilting By the Bay that I love to visit.  There also used to be a quilt show every President's Day weekend in PCB - I don't know how regularly they have them anymore, but it looks like there's one this year!  (Road trip, anyone?)

        I decided to cut the minkee into big squares, remniscent of Gracie's original baby quilt. 
         
        I sewed chunks and then strips of the minkee squares together, and then put them back-to-back - no batting - with a big strip of the flannel using spray basting adhesive.  I quilted the section with doodly free-motion quilting, and then zig-zagged around the edges.

        Then I pieced the next section, laid it right side down on top of the first section with one of the edges matching.  I put the flannel back piece, right side up, underneath and matching the same edge.  Pin it to DEATH.  I stitched on this seam, flipped the new section so they were wrong sides together, spray basted, and then started quilting that section.  I zig-zagged around the edges of each new section, and I kept doing this until all the pieces were together and the whole quilt was stitched around the edges as well.

        When I was quilting, I did a lot of words and symbols that are special to our mother-daughter relationship, including song lyrics, hearts, flowers, and all my funny nicknames for her.

         
        Finally I added the blanket binding.  I have two words to say about that:  NEVER AGAIN.  What a pain!  You have to pin it to death and I still kept getting little tiny puckers.  I thought it would be a fast way to bind a quilt, which I suppose it was, but I don't think it was worth the headache.  If there is some trick out there to doing it, please let me know and maybe I'll give it another shot.

        So that's two down, and twelve UFOs to go.  Not bad for January!  What are you working on this week?

        Sunday, January 2, 2011

        Resolution - Queen of the UFOs

        Oh, how I love a new day, week, year! Even better this year when January 1 was on a Saturday. New Year's Day is a holiday, so I never really want to start my resolutions in the morning and then eat a big dinner of pork and black eyed peas and collards that afternoon (usually followed by dessert...AGAIN!).

        This year we got January 1 to relax, and then today, Sunday, January 2 to plan and resolve.

        I have lots of resolutions. The first ones are quilty. I was the last crowned Queen of the UFOs on Stashbusters for 2010 and finished in the nick of time to avoid a penalty.

        This year I managed to complete 38% of the 13 UFOs I listed one year ago:
        1. Susan's Quilt
        2. The Green (and Purple) Quilt
        3. Orange Crush
        4. WannaBee at the Ocean (not originally listed for some reason)
        5. Mom's Quilt
        6. In the Beginning
        ...as well as several Kindle covers and other small projects.

        I am taking honest stock of my 2011 UFOs and WIPs.  There are so many!

        Jewel Box Jacket - haven't finished because I can't remember the "safe place" I put the remaining precut pieces

        Grace's Minkee quilt - which only lacks the binding.  I bought pink satin blanket binding for it years ago and put it in yet another "safe place."  I can't bring myself to buy it again. UPDATE:  I found it while I was cleaning out my UFOs!  This is first on my list to finish!  (Too bad the Jewel Box Jacket pieces weren't with it.)

        Breast Cancer Quilt - more of a WIP than a UFO, but I work on it in bursts

        Cut Ups 4" Block Swap Quilt - needs to be sandwiched and quilted, always a bump in the road for me

        President's Quilt - ditto

        Winnie-the-Pooh quilt - another twin sized quilt with no planned home.  I lost interest.  It only lacks a border for the top to be complete.

        Purple quilt - I won these blocks in a guild block swap, put them together on point, and now the edges are all wavy and wonky. 

        Home Guild Challenge - the only new 2010 UFO.  I'm so disappointed I didn't finish this.

        Halloween Round Robin  - Not on the original list -a guild challenge from several years ago.

         Christmas Round Robin - Not on the original list - ditto

        Pam's Gift   - Not on the original list - this was a Christmas gift ages ago from a quilting buddy.  I kept thinking I'd add to it, but never found the right fabric.  It just needs to be quilted so I can move along!

        Purple Medallion  - Not on the original list - I won this at the guild Christmas party and never finished it.  Again, thought I would add to it.  I may just re-donate it to the party so someone who loves it can have it.

        Sunshine and Shadow  - Not on the original list - This is probably my oldest UFO now that Mom's quilt is done.  It was my attempt to make a king sized quilt that I could quilt myself, in sections.  I would love to finish it as I still love it.

        Charity Quilt   - Not on the original list - just some strips that I used as leaders and enders and then practiced my free motion quilting.  Binding almost done!

        And my WHIMs as well (none of these have been started, but they all have to get done this year):
        1. Baby Boy Quilt 1
        2. Baby Boy Quilt 2
        3. Jamie and Joe's Baby Quilt
        4. Guild Challenge
        5. The Bear's Graduation Quilt
        If I could finish one of these every 2-3 weeks I'd clear the decks by 2012!  Can you imagine?  (No, me neither.)

        True confessions time:  How many UFOs do you have?

          Friday, December 31, 2010

          One More Homemade Gift or My Oldest UFO

          My big accomplishment in the gift department this year has been a long time coming.

          Back in 1998, when I was still a very new quilter, I fell in love with a Thimbleberries block of the month pattern.  My local quilt shop, sadly long gone now, had kits you could buy each month.  I quickly pieced the first few blocks before realizing that I had nowhere for this quilt to go.  It was a twin size but, although my boys were in twin beds, it was not boyish or juvenile at all - totally inappropriate for either of their rooms.

          My mom also loved the pattern, and suggested that I could make two of them and give them to her for my brother's old room.  She said she'd even redecorate the room around the quilts.  Silly me, so young and vain and naive!  I hadn't learned the danger of "Twin Quilt Syndrome" (closely related to, but much more expensive than "Second Sock Syndrome").   Which is to say that making the same thing twice is boring. 

          The blocks were pieced in no time - probably no later than early 1999 - and the tops finished and sandwiched by the end of that year.  But then I was pregnant with Gracie and making two quilts for her (that's another post), and got distracted. 

          I started hand quilting the first quilt, only to realize within a short while (okay, a few years!) that machine quilting was not only possible but faster and...well, faster.  If you think hand quilting a bed sized quilt takes a long time, you should try it when you aren't enjoying the process at all.  By this time it was a chore hanging over my head.  Every Christmas, Mother's Day, birthday, or anniversary, my mother would hold the gift in her hands for a moment and mournfully observe, "It's not big enough to be my quilt."

          I finally got the first quilt done and wrapped it up for Christmas in, I think, 2006.  It's kind of a blur at this point.  I was so excited, but also dreading finishing the other one.  Now the pressure was really on.

          Luckily I had cut all of the pieces, including the binding, at one time and actually managed to keep up with them.  Aren't you impressed?  I sandwiched the second quilt, moaning and groaning the whole way.  I got the blocks quilted, and then decided to go ahead and bind it. 


          Marking the quilting in the border is always my least favorite part. It had taken numerous tries to find a suitable marking utensil that would show up on this deep red and still wash out, but about halfway through the first quilt I had discovered the Clover white pen.  I don't know if they don't hold much ink or if they dry out easily, but I went through three of them marking these quilts!
          I got about half of the border quilted by last Christmas, but then got stuck trying to work out how the ends would come together.  I finally bought yet another white pen around Thanksgiving and decided to suck it up and finish the darn thing.

          On Christmas Eve I ran out of thread with about 18" of quilting left to go.  I didn't even know where to get more of this particular brand of thread, so I just said, "the heck with it!" and finished with a slightly lighter color.  I'm so glad I didn't make myself crazy over that because, now that it's washed and dried, you can't even tell where that spot is. 

          I held my breath and washed and dried it.  I was so relieved and excited that there were no loose spots in the binding or repairs to be made, simply snipping some threads and taking pictures.

          Of course, after all those years of listening to my mom, I couldn't bring myself to put a big box under the tree.  She'd know what it was in a heartbeat!  So I wrapped up a new cookbook and, as always, she sighed before unwrapping it and said, "Still not big enough to be my quilt."  The kids and I swallowed our giggles.

          Gift giving was over and it was time for dessert and dishes.  My parents and in-laws were lingering over coffee while DH and I started washing pots.  I tsked myself and said, "Darnit!"  And then, "Hey, Mom.  Can you do me a favor?  I just washed a load of dish towels so I'd have a bunch, but I never got them out of the dryer.  Can you run and get them for me?"

          At this point, a couple of people were suspicious.  I'm a big believer in kids doing manual labor, and all three of mine were standing right there.  I know my mother-in-law wondered why I hadn't sent Gracie up those stairs instead of asking my mother to go.  I know Cousin Judy was silently disapproving of my blatant disrespect for my elders.  But my mom didn't bat an eye.

          When she opened the dryer, she saw a sign that said, "Merry Christmas, Mom!" and her quilt.  We all waited quietly at the bottom of the stairs until we heard her yelp with delight.  The first thing she said was, "Honey!  We have to paint the guest room!"

          And that's the story of my oldest UFO.  Started almost 13 years ago in January of 1998.  Finished on Christmas Eve, 2010. 

          What's your oldest UFO?  Fess up!

          Have a safe and happy New Year's Eve!

          Wednesday, May 13, 2009

          It Might Leave a Mark

          I've already blogged about what I hate most about quilting.

          Here's the thing that...well, I don't exactly hate it, but I'm generally lazy and don't bother to do it right:
          Yep, basting a quilt and then marking it (or vice versa) is so tedious and slow when I just want to get to the quilting part that often I just skip it and free motion quilt or eyeball my - ahem - "straight" lines.

          And normally when I have a very geometric pattern, such as the Bento Box, I lean toward a more curvy-swervy-fluid quilting design (yes, that's the technical term) to break up all those lines. For some reason, though, this one seemed like it needed more lines, just going in different directions.

          I saw this quilting design, which I've never used, while flipping through an old book that I've used once and have considered selling or giving away. And, upon further thought, I realized that this was not something I could just eyeball or freehand and have it come out looking right. Good thing, because when I sat down to mark the quilt I couldn't even draw it freehand, much less quilt it that way. It took a ruler and some contemplation and a LONG time.

          I hope it is worth it.

          Now I'm going to see if I can find a nice variegated thread to use, because the basic tan I had planned to quilt with seems a little boring after all of that. The Wanna Bees are meeting tomorrow, so I hope to make some progress.

          Also, I have to brag. I have blueberries!
          There are only about 8 of them, but I am so excited! I have always wanted blueberries, ever since an older gentleman at a nursery once told me that they are the perfect plant: drought resistant native to GA, with flowers in spring, so-good-for-you berries in the summer, lovely colored foliage in fall, and evergreen in winter. My mom bought me two plants in February, but Daisy kept digging one of them up (but left the other alone - no clue why). We are down to this one little lovely with her 8 berries so far. I can't wait to taste one.

          Anyone know when they are ripe?

          Have a great day!
          Related Posts Plugin for WordPress, Blogger...