Showing posts with label marking. Show all posts

Monday, June 12, 2017

#MachineQuiltingBlogHop Week 7 - Exploding Star

machine quilting blog hop

Welcome to Week 7 of the Machine Quilting Blog Hop!

ultimate guide to machine quilting angela walters christa watson exploding star continuous spiral modern block turnaround

Today we are working on Chapter 7 of The Ultimate Guide to Machine Quilting by Angela Walters and Christa Watson, Exploding Star.

ultimate guide to machine quilting angela walters christa watson exploding star continuous spiral modern block turnaround


I learned Christa's technique for quilting a continuous spiral in the class I took with her back in February, and I've been looking for an opportunity to practice it again. I thought this Turnaround star block from the Modern Blocks Hop would be just the thing to show it off.
ultimate guide to machine quilting angela walters christa watson exploding star continuous spiral modern block turnaround aurifil clover white pen

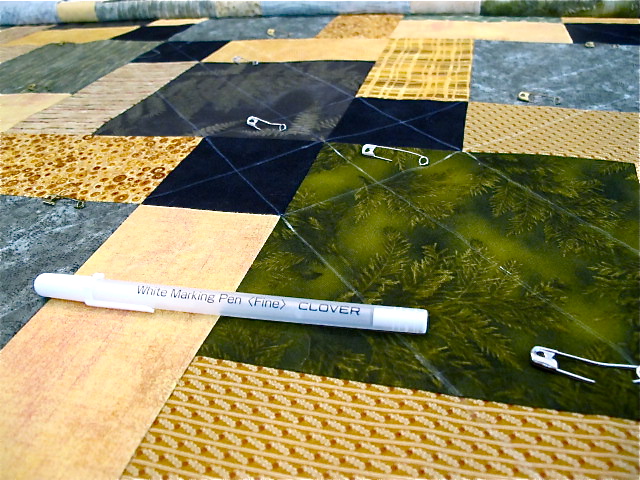
An Aurifil spool is about the perfect size to start this, and my Clover white pen shows up on the deep blue.


ultimate guide to machine quilting angela walters christa watson exploding star continuous spiral modern block turnaround


I chose a variegated blue thread, which I think gives the design some interesting movement. The only downside is that the wobbles are more pronounced, but I just keep reminding myself that this is practice. I didn't finish because my bobbin ran out, but you get the idea. I really do love the effect of this design, and it's not hard, although you do have to take your time and go slowly.

This book has been so helpful for me to see different ways to quilt specific areas and shapes, and it's still on sale at the Martingale site. Don't forget to visit Vicki, Kristin, and HollyAnne for their take on Exploding Star.

Please jump in and join us on your favorite social media channel using the hashtag #machinequiltingbloghop and post pictures of your progress. No blog required! 

Monday, May 22, 2017

#MachineQuiltingBlogHop Week 4 - Fractured Squares


#machinequiltingbloghop christa watson angela walters ultimate guide to machine quilting

Welcome to Week 4 of the Machine Quilting Blog Hop!

machine quilting blog hop angela walters christa watson fractured squares

Today we are working on Chapter 4 of The Ultimate Guide to Machine Quilting by Angela Walters and Christa Watson, Fractured Squares. 

machine quilting blog hop angela walters christa watson fractured squares modern blocks night and day

I decided that this orphan Night and Day block left over from the Modern Blocks Quilt Along would be a great place to practice these walking foot designs.

machine quilting blog hop angela walters christa watson fractured squares clover chaco liner

I used the Clover Chaco Liner to make some registration marks, but mostly I just used the edge of my walking foot and aimed for the next dot. 

machine quilting blog hop angela walters christa watson fractured squares clover chaco liner mark tool

I still prefer free motion quilting to straight line quilting, but this was a fun exercise. The straight line spiral kind of bugs the OCD side of me, but I love how the triangles with the overlapping grid turned out.

machine quilting blog hop angela walters christa watson fractured squares night and day

There's still time to jump in and join me, HollyAnne, Kristin, and Vicki as we work through this book. You don't have to have a blog - just post on your favorite social media channel using the hashtag #machinequiltingbloghop and show us what you're working on.

Friday, December 13, 2013

FMQ Friday and a Whoop Whoop! - Fabric Postcards for Christmas

Free Motion Quilting Friday

Today is Free Motion Quilting Friday over at Leah Day's Free Motion Quilting Project.

The rules are simple:
  1. Link up with a post that features something about Free Motion Quilting (FMQ). 
  2. Somewhere in your post, you must link back to Leah's site, or you can just post the FMQF button in your sidebar. 
  3. Comment on at least a few of the other FMQF links. Share your love of free motion quilting and make this weekly link up a fun way to connect!  

I'm so excited to finally show you the fabric postcard I made for Carol for the postcard swap over at Quilt Cabana Corner.


I had bought this fabric at Sew Main Street over a year ago, but couldn't quite bring myself to cut into it yet.  When I saw the postcard swap, I knew immediately what I was going to do.


I started off by fusing a 4 1/2" x 6 1/2" piece of fabric onto a 4" x 6" piece of Peltex.  Then I lightly marked the path of my letters and pinned my cording into place. 


Using a narrow zig zag stitch, I couched the cording into the word "Joy."


Then I held my breath and FMQed all around the design with Sulky Sliver, a beautiful but sometimes challenging thread to sew with.  I used it on the snowflake quilt with a lot of cursing and breakage.  This time I turned the tension WAY down and went a little slower.  Voila!  No breakage or nesting at all!

I trimmed the top fabric to the 4" x 6" size of the Peltex.  Then I cut a 4" x 6" piece of white muslin for the back.  I drew a line vertically down the center and wrote POSTCARD at the top with a Pigma pen.   I drew horizontal lines on the right side for the address and filled that in.  Then I added my message to the left side. 

I used my Tulip Tool to add a little extra sparkle to the front. I love how this looks!  Last, I layered the back onto my quilt sandwich and stitched around the edge with a tight zig zag stitch twice.

I ended up mailing mine in an envelope because the line at the post office was insane, but I have had good results sending these through the mail.  Carol sent me this beauty, and it arrived perfectly with no envelope to protect it.  She also used metallic thread and did gorgeous FMQing.  I will be bringing this to work to show off and adorn my desk.

Thanks so much to Sandi for organizing and to Carol for my lovely postcard!  This was such fun.  If you want to see the others, you can visit the Flickr group Sandi set up.


Can I Get a Whoop Whoop?  My big boy will be home tonight.  Nothing makes me happier than having all my chicks in the nest.  I hope you are surrounded by people you love this month.


Saturday, October 22, 2011

Gifts From the Studio - Think Pink!

I know, I know...my days are all off.  I meant to post this Thursday but it's been crazy here!

This isn't really a holiday gift, unless you count "watching a friend blossom into an amazing person and advocate through a challenging time" as a holiday...which I guess I do!

This weekend my walking buddy of days gone by is participating in the Susan G. Komen 3-Day For the Cure Breast Cancer Walk.  She is walking with several of our mutual friends, plus her mom and sister who came to town for the event.  If you remember, we whipped up a little something for her mom last summer.  I'm glad to report that her mom is doing great and they should be about half way through the 60 miles right about...NOW!

My foot issues prevented me from walking with them, although I did hop on some of the training walks for a few miles at a time when I could.  It has been an amazing thing to watch my friend get to this point.  When we met and started walking together several years ago, we high fived on the day we bumped it up from two to three miles.  Now she's walking sixty in one weekend, and logged literally hundreds during her training.

I wanted them to know that I was with them in spirit and cheering them every step of the way.  I decided to make some mementos.  The first was this little "scrap tail" that they can write on.  This was easy to do with scraps of pink and white fabric and some fat pink rick-rack.  I used a pinking blade on my rotary cutter, but you could use pinking shears too.

I put the fabric slices back to back with the rick rack in between.  I used a 23" strip of rick rack. The strips were varying sizes, but on average they were 2" wide and 7" long.


Then I just stitched down the center of the rick rack.


And voila!  I thought this would be cute to make even longer like a feather boa, but my buddy wanted something a little shorter to attach to her backpack.  I gave them each a Pigma pen to carry and add names along their journey.


I wanted something extra special for my buddy and her sister to wear in honor of their mom's fight last summer.  I printed a picture of her mom on a fabric sheet, along with "I walk in gratitude for " her name, and "Survivor" on it.  I couldn't leave out mom, so I made one for her with a picture of the three of them and the text "I'm walking with my daughters" and "I'm a survivor!"  I also made one more for my buddy with the picture of a friend who is a survivor AND walking her 5th walk this year!  Yes, I am friends with some amazing women.

Anyway, back to the tut:

I cut 1" strips of pink ribbon fabric and stitched them around the edge of my photo.  Then I made a little quilt sandwich with a piece of pink ribbon fabric and batting cut to the same size.  Make sure your fabrics are right sides together with the batting at the back.


I cut a 4" piece of pink rick rack to tuck in the corner to hang it by.  Make sure to pin the raw edges in your seam allowance, and be sure the middle doesn't get into your stitch line.


Stitch around the edges and leave a small opening for turning.


My buddy said this was a really special way to let everyone know who she was walking for!


To find out about a 3-Day event in your area or to make a donation, visit the3day.org.


Monday, August 8, 2011

Oversized Disappearing Nine Patch Tutorial


Although this quilt is everywhere, and I'm possibly the last quilter on earth to make one, I thought I'd give you a quick overview of how I did it and the size blocks I used.

Recap:  A Disappearing Nine Patch block is a Nine Patch that you cut in half horizontally and vertically and then rearrange the resulting blocks.  There are numerous layouts you can use, although I haven't found one site that lists them all.

Here are some that I love and considered:

Chain

Easy Sashing and Cornerstones

On Point

Twist and Turn

Random

I chose to make the "chain" style (and that's only my name for it, as far as I know).  I wanted it to be a little less random and scrappy looking for this particular quilt.

I liked how the giant Bento Box blocks turned out on my older son's quilt, so I went for the same look here.  After playing with the math, I ended up with twelve 19 1/2" blocks.  This gave me a finished quilt that was 58 1/2" x 78". 

To get these, I chose six green fabrics, six gold fabrics, and one black fabric.  You need 2/3 yard of the black, although I bought a yard so I can use it for the binding as well.  You also need 1/2 yard EACH of the green and gold fabrics if, like me, you found six different ones.  If you only use one of each color, then you will need 2 yards of each.  Plus you need any border or back you choose. 

I cut eight 7" squares from each green and each gold fabric (for a total of forty-eight green and forty-eight gold).
I cut twelve 7" squares from the black fabric.

Before doing any sewing, you need to decide if you want the blocks to be the same (as in, the same green in each corner and the same gold in all four places) or truly scrappy.  I tried to audition them both ways, but it was a little tricky to envision.  If you are unsure, sew them together so they are the same, and try mixing them up after they are cut.

I wanted mine to be as scrappy as possible, but I got a little controlling with making sure that there weren't clumps of the same color.  Here's how I did it:
    1.  Lay out the stacks of fabric so that all of the squares in the stack are the same.

    2.  Take 2 squares from each green fabric and set them to the side.
    3.  Take 2 squares of each gold fabric and sew them to a black square. Press towards the black.

    4.  Now you have 6 remaining squares of all 12 fabrics.  Starting with one green stack, pair each one with a different gold square.    Follow this pattern for the remaining five green fabric stacks.  This will use up the remainder of the squares.  Sew these pairs together.  Press all of your pairs towards the green. 
    5.  Sew each black/gold pair to a green/gold pair, ensuring that the gold fabrics are different.  Press toward the green/gold pair.  You will have green/gold pairs left over.


    6.  Select another green/gold pair that has different fabrics and sew it to these blocks.  Press towards the black.  You will have green/gold pairs left over.


    7.  Now take your remaining green/gold pairs and the green squares you set aside in step 2.  Sew a different green to each one.  Press towards the green.


    8.  Lay out your blocks to make sure they are as scrappy as possible and sew the bottom row onto your nine patch.  Press toward the center.


    You should now have 12 scrappy nine patch blocks.  Cut each one in half both horizontally and vertically.  Now you have 48 ten inch blocks.


    Lay the blocks out in whatever way pleases you and sew together.  I prefer the "chunking" method to sewing them in rows.

    Add a border if you prefer.  I chose not to.  Press well.  Sandwich for quilting.

    Quilt as desired.

    Just kidding!  You know that's my pet peeve!  Of course you can quilt it however you'd like.  I chose to use a grid similar to the crosshatch design on my older son's quilt.


    If you try this, let me know how the directions might be improved.  I'd love to see pictures of your D9P quilt!



    Thursday, August 4, 2011

    Quilts of Valor - Presentation Bags

    I know it's been months since I got the Quilts of Valor from our guild challenge, and I've only presented two of them.  Like many of my projects, I got bogged down by the details.  Since we decided to donate these quilts locally instead of shipping them off to QOV, I got stuck on the part about finding the vets to give them to.

    As with most of the best things in my life, there was serendipity.  I had registered the two quilts donated to Donn and Mark with QOV, so my email address got put on a list somewhere.   Susan Gordon, the recently appointed regional coordinator, contacted me to find out more about our guild and the quilts we made.  She had some great information, including a contact at the Veteran's Hospital in Augusta, Georgia. 

    I also realized (after Donn and Mark got their quilts) that they were all supposed to be in a presentation bag/pillowcase.  I was going to just whip up a few out of the many patriotic fabrics in my stash until I found this:

    How perfect is that?  I was in JoAnn's to buy my favorite white marking pen while it was 40% off (marking the Bear's quilt took almost a whole one!) and noticed a display of July 4th type fabric marked half off.  I planned to just walk on by since, as I mentioned, I have PLENTY, when I saw these little houses.  There were 8 yards left, about enough to make ten pillowcases from this awesome easy pattern*, so I took it all.


    Now they are ready to go to their new homes as soon as I can get them to Augusta! Maybe next week when everyone's back in school. That ought to keep me busy instead of missing them.

    *The only things I do differently on this pattern are that a) I left off the accent strip, b) I didn't trim the selvedges before sewing the cuff on; I just trimmed the whole pillowcase after this step,  and c) I sew the side and bottom seams all at the same time, just pivoting around the corner instead of making it 2 separate steps.   Faster/lazier.  It's a fine line.


    Wednesday, July 20, 2011

    Basting the Bear's Quilt

    I've mentioned before that basting and marking a quilt isn't my most favorite thing.  I've tried basting with needle and thread (kill me now), spray basting (quick but makes me nervous about gumming up the machine), and pinning.  I've basted on my family room floor, kitchen counters, and dining room table.  There's no way around it - it's a hassle.  That's my excuse for why the Bear is still sleeping under his train quilt.  Oh, it won't kill him!

    I was whining about it to discussing this with the WannaBees last week, and Jodi suggested that I try Sharon Schamber's method with two boards.  Jodi even had the boards for me to borrow, so that's hard to turn down.  I'm not going to go into a big discussion of how to do it when the video is a much better tool, except to say that I chose to pin instead of basting with needle and thread.  It still worked great.  I will also say that it is much easier to do with a tiny quilt, like Sharon does in the video, than a twin sized quilt, but it still worked better than the floor or taping the back to my kitchen counters in sections.

    Here you can see that this fit on my dining room table.  It was nice, as Jodi mentioned, to be able to sit at the table and pin a section in between other tasks vs. crawling around on the floor begging the dogs to stay off the quilt for just a few minutes. 

    Who? Me?
    I also realized that this was a perfect time to mark the quilt.  The quilt is laying nice and flat on a large table, so you can see all the points you want to match up and have enough room to lay a long ruler across it.  I used my favorite white pen again and marked the cross hatching in no time at all. 


    I hope to start the quilting today, although I definitely need more thread.  I'm not sure what I was thinking when I bought only one spool.  Luckily Mom and I are going on a field trip this week to A Scarlet Thread, the largest quilt shop in Georgia! 

    Below are links to the two videos.  Let me know if you've tried this method and liked it, or if I am missing out on something else. 


    Thanks so much to Sharon Schamber for sharing this technique, as well as the many free tutorials on her website.  She is a fountain of information!  Also, thanks to Jodi for letting me try out the boards. 


    Sunday, March 20, 2011

    Greater Atlanta Shop Hop 2011 - Little Quilts

    Let's go to Little Quilts for our next Shop Hop Review!

    The WannaBees went there the same day we went to the Red Hen.  That was where I finally found that Clover pen that works so well for marking dark fabrics. 

    For the Quilter's Tour of Homes theme, they chose a beehive.  What a fun choice!  I'll bet there are lots of bee groups who will buzz by to get their passports stamped. 

    It's also a good metaphor for this particular shop.  They stay busy as can bee writing patterns and books, designing fabric, hosting all sorts of classes and online groups, and keeping up with all the fabric and notions you want.    

    For all the news about the Shop Hop, follow their blog.

    Related Posts Plugin for WordPress, Blogger...